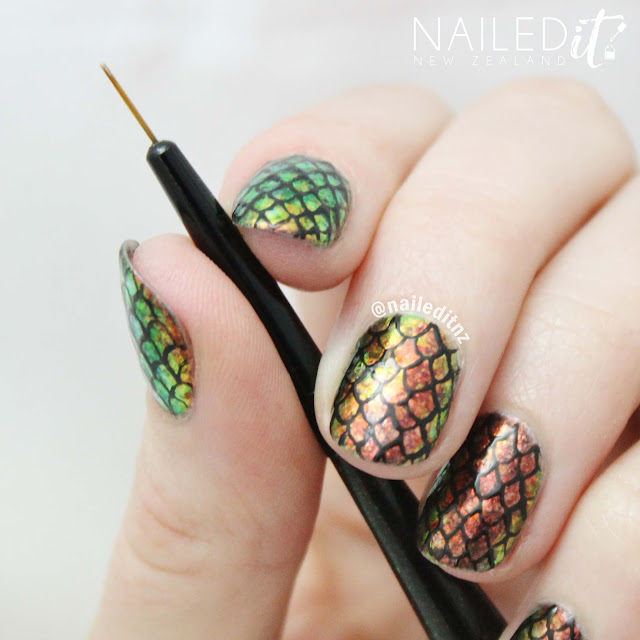
Dragon Egg Nails - Game Of Thrones Inspired! | Born Pretty Store Review
Today's something of an important day, for me. For years this blog has been rejected for months at a time, with only the occasional post to promote something major. However, I've made some big decisions about the future of Nailed It NZ lately, and the end result is that from now on there will be a lot more blogging and a lot less YouTubing. I could write a book on all the reasons why, but the main ones are outlined in this Facebook post.
I'm quite excited. I'm far more eloquent in writing than speech (it's hard to act natural on camera when you've messed a line 34728947294 times!) and this just feels right. I'm going back to my roots, before the high workload/low reward of YouTube destroys my passion for nail art. The plan at the moment is to be much more active on Facebook and Instagram, and update this blog once a week. Of course, my shop will continue as usual, selling nail art brushes and nail files.
So! Here we are! This post is a review of some Born Pretty Store goodies. I've used their products for many years now, and they were the first company to ever contact me. Cheap and with a wide variety, they're great - as long as you're prepared for a bit of a wait for their (free) shipping.
I've created some Dragon Egg Nails using two of the products they sent me. I had quite an exciting goodie bag and was sorting through and testing it out when I discovered these iridescent flakies. They're actually SO amazing. You can check them out on their site here.
As you can see, it creates the most amazing colour-changing nail, with huge amount of depth. The second I saw how it looked I was blown away, and after raving about it to hubby I decided to create Dragon Eggs out of it. I had just caught up in Game of Thrones (SO GOOD!), so it was pretty good timing.
I used my detail brush from my own Nailed It NZ line for the details. What I love about this brush is that it's fine enough for whisker-thin details, but once loaded up can cover large areas with ease. You can buy my brushes (and files) here.
I used gel polish for this design, although you could achieve the same results with normal polish. I pressed the glitter into the tacky layer and sealed it with a top coat, however you could use nail glue or clear polish for this part. For the scale pattern on the egg, I used this black soak-off gel, also from Born Pretty Store. I've tried a few different brands of gel paint in the past, and have often had issues with it curing. This kind of gel is highly pigmented and some lamps just don't work with it... but I was pleasantly surprised to find it cured with no issues at all! For those wondering, I use largely EzFlow gel polish and the EzFlow LED lamp.
I made a video for this one - and without narration and all the little details, it was a lot easier to do! Not every design I do from now on will have a video tutorial - some will have picture tutorials and some will just be images of the design. I'll judge it by whether I think it needs a tutorial or if the steps are pretty obvious. And, of course, if I have the time ☺.
Here's how this design was done.
I had a bit of a fail with these - half an hour after painstakingly painting both hands, I went and made a batch of scones. I used a metal bowel, and while kneading accidentally scrapped off the tip of the gel polish on the bowl - breaking the seal. This allowed water to sneak in with some of them and the top layer started peeling. To prevent against this, make sure you avoid metal bowls (!) and try to minimise the glitter on the free edge of the nail. Apply two coats of top coat and cap the tips thoroughly.
Overall, I love these BPS products. Both did what they were meant to and were easy to use. I love the design I created with them and I got so many compliments on them!
If you want to buy what I used in this post for yourself, you can find the links below.
Chameleon Iridescent Flakies by Born Pretty Store
Black soak-off gel by Born Pretty Store
Detail Brush from Nailed It NZ
The Born Pretty Store products used were gifted to me, but of course all opinions are my own. There are affiliate links used in this post, so if you want to buy the products please do so with my links - it helps support my blog! You can also support Nailed It NZ by buying my own products or supporting me on Patreon ☺.
Thanks for reading my first proper blog post in a LONG time, and I'll see you again next week with some bright and easy Crayola nails.
♥
Jessie


Very eye-catching manicure, well done! :-) First I thought you did some stamping, then I realized it's a free-hand manicure! :-)
ReplyDelete