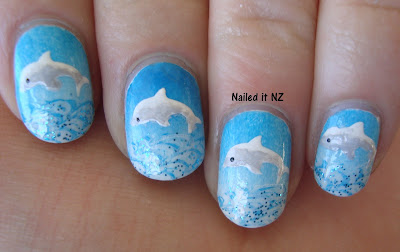
Dolphin nails (with tutorial)
Wow, just realised I took 143 photos of these nails. What. A. Freak. However, at least I was a freak with cool nails, see?
I managed to narrow it down to just 15 photos - which is a lot of photos for one post, but I think it's justified seeing as I'm doing a pretty detailed tutorial.
Things I used:
Polishes: Blue, white, clear, base coat, grey and blue glitter.
Brushes: Whatever I had that wasn't a mess - my brushes were really cheap and half of them are all frayed now (I didn't know how to look after them at the start, too) so I just used a small brush for cleaning up the cuticles.
Extras: BM-216 and these stencil things I found at a pharmacy for cheap cheap cheap! See the picture below. Also a make up sponge, but apparently other sponges work fine too.
 |
| Dolphin stencils - not necessary but makes it easier. |
 |
| BM-216 |
Okay, after your base coat you're gonna want to paint your nails white. I like to clean as I go (ha, my house would say otherwise), so I've cleaned them up with a cotton bud and a little brush.
Now you need to choose your colours for your gradient. If you're normal you probably only have one or two blues, but as you see I had quite a few choices. I went for the blue in the middle set, second from bottom. It's a CR polish.
Now, put a few dabs of paint on some paper (or a plastic lid, that's better actually) and next to it put your other colour, in my case white. Swirl it together with the closest semi-pointy thing - I used a cut-off end of a cotton bud. With your make up sponge, press onto the polish, as I've done in the picture.
Now gently sponge it on to your nail...
... until they're all done, and your fingers are a mess.
With another trusty cotton bud and brush, clean up those messy hands! I think about now I applied a top coat. If you apply it straight after the sponging it'll blend it, by the way, which can look pretty cool.
After it's dried for about 15 minutes or so, stick a stencil it on your palm a couple of times to make it less sticky. Then carefully place it on your nail and press down. Then with an opaque white (I actually used my striper brush), brush over the design - don't go over the edges!!.
Continue with the rest of your nails.
I was going to stop here, but was having too much fun. So I hunted through my BM plates and found a cool little wave pattern. I stamped that on in blue, twice when needed, then stamped over it in white. I love how this turned out!
Next I added eyes with a dotting tool - but you can use a toothpick or whatever.
Lastly, using a lighter grey, create some shading on the dolphin - I didn't do this very well on most nails :/. Then put a couple of layers of blue sparkley polish over the waves.
And there you go! Gotta say, I am pretty proud of this manicure. The stencils were very helpful though, I don't think I could draw dolphins that well!
If you try anything like this, I want to see! :)


this is really cool...I'm so gonna try it
ReplyDeleteThese are beautiful and really well done, but I also love your comedic style of writing - and the fact that you want to see people's attempts at your own creations! I found this on tumblr and have a feeling I'm going to be reblogging a lot of your stuff...
ReplyDeleteAw thanks, that was a lovely comment to read! I'm glad you like my nail art.
Deletemmm.. I haven´t words which would be say how this is fantastic! Simply FANTASTIC!
ReplyDeleteYay thank you! I love these ones too :)
Deletewow, this is so awesome, love it :D
ReplyDeleteThanks!
DeleteAll I can say is WOW!!!
ReplyDeleteHehe thanks!
DeleteJust saw them on pinterest
ReplyDeleteGonna remake them. Only the dolphins gonna be a dashica stamp
Awesome!
Delete